Ammabel Tukiman’s URAP experience: Who’s in there?
Imagine this: You’re humming a little tune to yourself as you walk by the fossil of the T-Rex in the Valley Life Sciences Building, and suddenly, you feel a little something on your skin. You look at your arm… and there’s an ant! What would you do?
If I were my previous self, I would have screamed and slapped at my arm furiously, trying to get rid of it. As a kid, I had an innate dislike for insects. The thought and sight of them always made my skin crawl, and I would always hide behind my father and cry at him to dispose of them. As I got older, this loathing I had for insects continued on. However (and thankfully), a biology course I took in community college changed the way I viewed these little – and sometimes not so little – creatures.
Despite how taxing it was to remember the taxonomy, I truly enjoyed taking the course. Having seen so many pictures of different animals, even the insects started to look adorable and interesting to me! They were no longer these disgusting creatures I found the urge to kill every single time. So, if someone were to ask the current me what I’d do if I saw an ant, or any insect really, on my arm, I would still scream but for a different reason – happiness and excitement. (Moreover, if it weren’t for my aversion to selfies, I would even take a selfie with it, before moving it to another surface.) Insects are so interesting to look at and observe – and it’s so much better to have found joy in them, instead of fear and disgust.
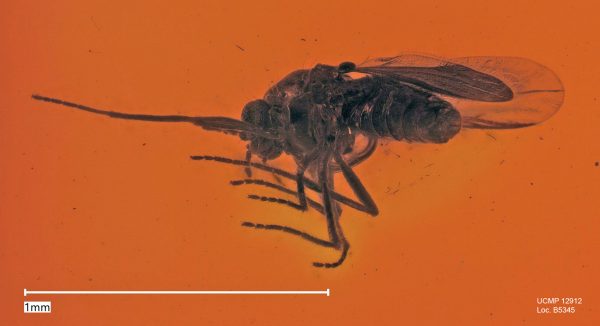
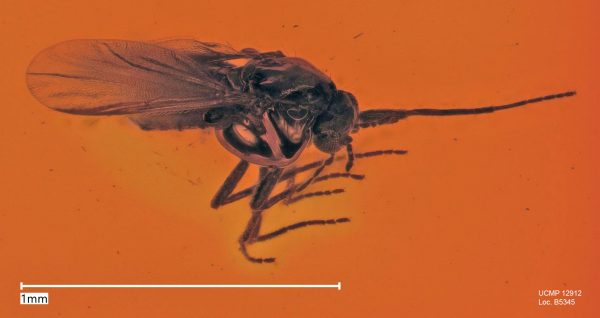
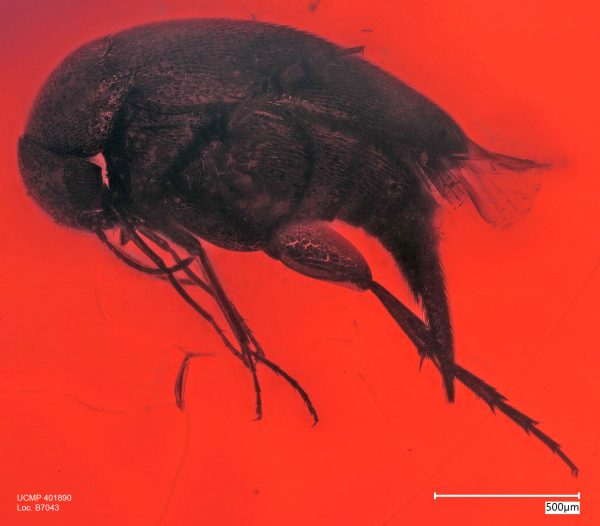
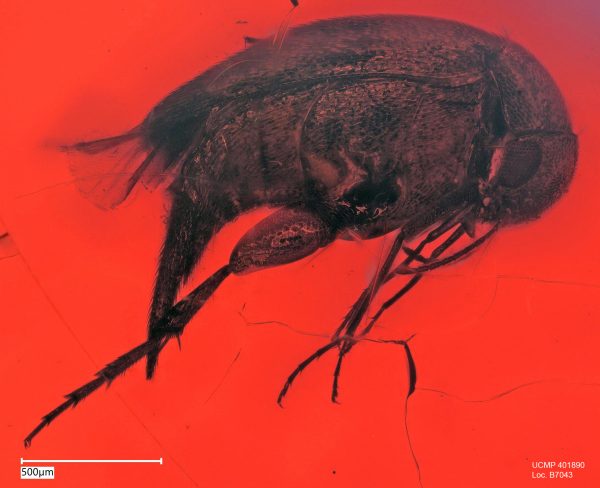
Thus, this Fall 2022 semester, I am truly honored to have gotten the opportunity to help the UC Museum of Paleontology image and digitize their amber fossil collection from Chiapas, Mexico. (More information about the UCMP Amber Collection can be found here.) Taken under the wing of Senior Museum Scientist Diane Erwin and a previous URAP student named John, I learned how to use the Keyence VHX 7000 digital microscope to image the insect inclusions inside the amber specimens. Then, I learned how to use Adobe Photoshop to process the photos, before uploading them onto CalPhotos for both researchers and interested members of the public to enjoy.
Using the Keyence VHX 7000
I’ll start off by saying that I had a very limited experience with microscopes. Before this opportunity, the only microscope I had used was one that came in a kid’s biology kit. Using that microscope was a fun experience, still, but I had my doubts about how quickly I’d be able to learn the techniques of using the Keyence VHX 7000 digital microscope with just that knowledge. And this was why I was surprised when I discovered the simplicity of such a complex instrument!
In just the few steps written below (credited to John Feng), an image of the insect inclusions in an amber specimen can be taken.
- Turn on the microscope, raise the stage, and adjust the white balance.
- Adjust settings to high resolution mode, and ensure that full ring light and transmitted lighting are on.
- High resolution mode gives a better image quality, while the full ring light and transmitted lighting help to illuminate the amber specimens so that the insect inclusions can be more clearly seen.
3. Load the specimen onto the stage and find the insect inclusion(s).
- Oftentimes, this takes a huge time of the process, especially when they are really small and there are other artifacts and debris inside the amber.
4. Adjust the brightness, lighting, lens angle, and magnification accordingly.
- If the specimen is not flat, we tilt the lens to make it parallel to the surface of the epoxy resin surrounding the specimen. This allows for less refraction of light, which would often result in a blurry image.
- Usually, we go for a 100x or 200x magnification because anything lower than that would give a more noisy image. However, for bigger inclusions, a lower magnification would need to suffice.
5. Focus up and down through the inclusion to determine the highest and lowest focal planes.
- The microscope automatically stacks a series of consecutive images into one composite image so a critical step is determining the insect body part that is at the lowest point and focusing on that part (ie., the tip of a leg or antenna, the edge of a wing) or a little beyond it, and also the body part that is at the highest point so you know when to stop the automated imaging process, capturing the entire insect in focus.
6. Name and save the image, and we’re done!
- We save the image as a JPEG file, and the naming convention we use includes the specimen number, the locality number, the date the photograph was taken, and the initials of the photographer. This aids in the processing and uploading processes.
Once done with the imaging, we move on to processing the images using Adobe Photoshop.
Processing the Images
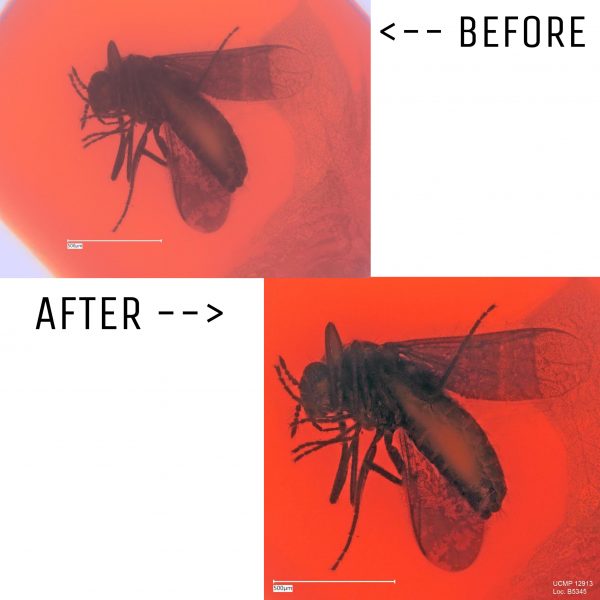
While the images taken using the Keyence VHX 7000 digital microscope are indeed clear and beautiful, they aren’t ready enough to be uploaded to CalPhotos – and that’s where Photoshop comes in. The images become even more detailed and crisp after processing!
Here’s a peek into how we process the images.
- Open the image file in Photoshop.
- Crop the image, ensuring that all parts of the insect are included.
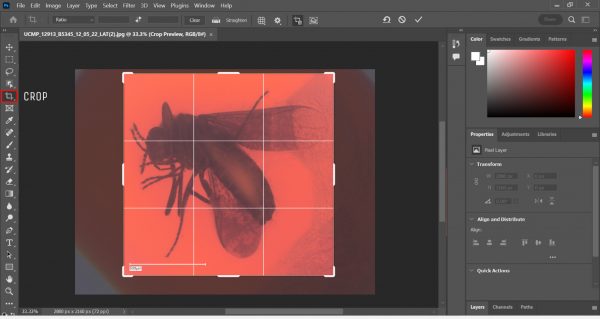
Using the Crop function in Photoshop. - Go to Image > Auto Color. Then, go to Image > Adjustments > Shadows/Highlights. This is where the magic happens!
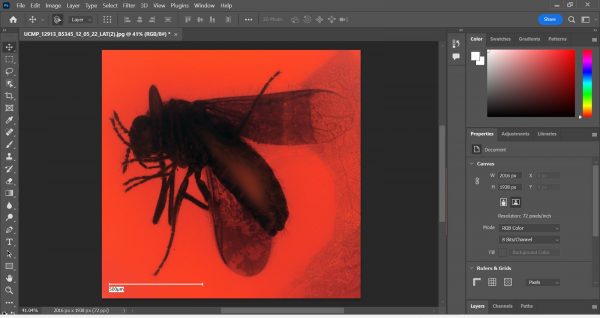
Using Auto Color in Photoshop to enhance the contrasts in the image. 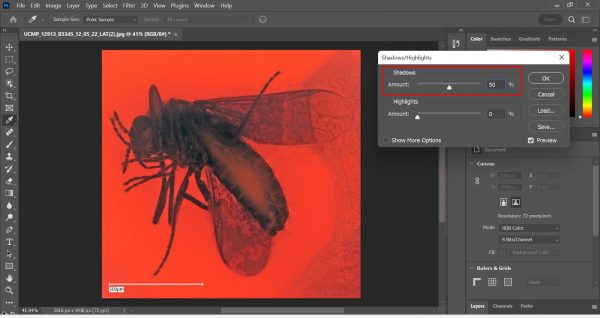
Using Shadows/Highlights in Photoshop. Usually, we only toggle with Shadows. This makes the details of the insect more visible! - Make a text box, type in the specimen number and the locality number, move the text box to a corner, and flatten the image.
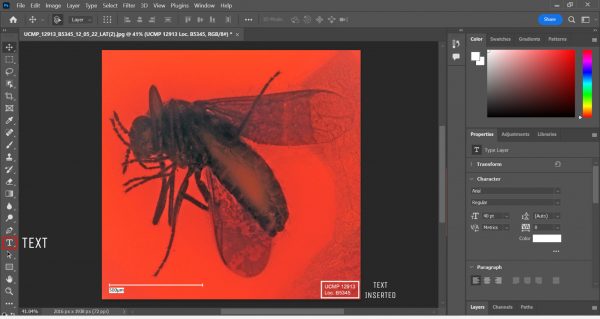
Using the Text function in Photoshop. - Save the processed image.
Sometimes though, in Step 3, the magic fails to happen and we end up with a whitened effect on the image. When that happens, we go to Exposure and play around with the effects to obtain the best-processed image we can make.
When we’re done with the processing, we move on to the final step – uploading the images.
Uploading the Images
I found this to be the simplest part of my URAP experience, but it was by no means any less satisfying or worthwhile. A CalPhotos contributor account was created for me, and then, I was off to upload the images that I had taken and processed.
To upload the images, I had to input only a few things – the specimen collection (in this case, it’s the Invertebrates (I) collection), the specimen number, the date the photograph was taken, the project, and the equipment used to take the image. The other details of the specimen would already be included.
The first time I uploaded my first image, I felt a huge sense of fulfillment. A particular comment from my friend, after I showed her some of my images, stuck with me. She said that I was now immortalized since my name was credited as the photographer – and it made me even more thankful that I had been given this opportunity.
I am really thankful to have gotten the chance to work together with Senior Museum Scientist Diane Erwin and help the UCMP digitize their amber fossil collection! Through my URAP experience, not only did I learn new techniques and tools while cultivating an interest of mine, but I also met some brilliant people who often made my day. It was an immense honor and pleasure to have been a part of this project!
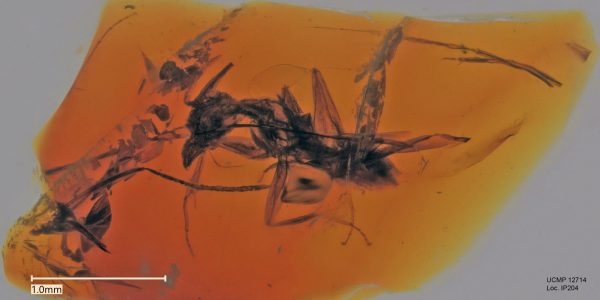
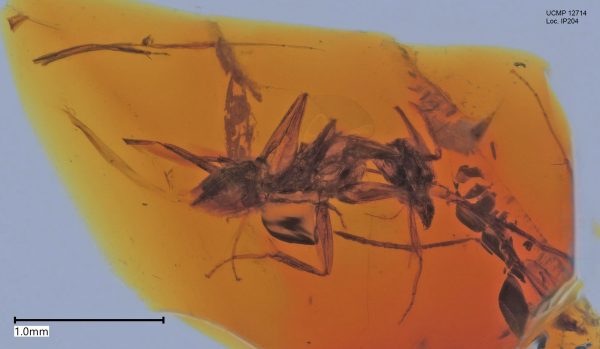
To end this, I would like to share some of my favorite images.